Project No. 14: Creating Memory Game With Arduino
1. Introduction:
Welcome to the
exciting world of Arduino game development! In this project, we embark on a
journey to create an interactive Memory Game that combines sound, lights, and
user input using an Arduino board, LEDs, buttons, and a buzzer. Get ready to
test your memory and enjoy a captivating gameplay experience!
Our goal is to build a
game that challenges players to match a sequence of musical notes played by the
Arduino. By pressing the corresponding buttons, players will attempt to
replicate the pattern and progress through the game. The LEDs will provide
visual cues, and the buzzer will play sound effects and melodies, adding an
engaging and immersive dimension to the gameplay.
2. Working:
Step1: Initialization:
Set up the Arduino board and connect the LEDs,
buttons, and the buzzer. Initialize the necessary libraries to control these
components.
Step2: Game Grid
You design the game environment, including platforms, obstacles, and other elements that Mario will encounter. These elements will be displayed on the LCD screen. Define an array or list to store the pattern
sequence of musical notes. Assign each musical note to an LED and a
corresponding button. You can use variables or constants to represent the
musical notes and their associated LEDs and buttons
Step3: Game Start:
Begin the game by randomly selecting a pattern
sequence from the available musical notes. This pattern sequence represents the
series of notes that the player needs to remember and reproduce. You can set
the pattern length based on the desired difficulty level. Play the pattern sequence by sequentially activating
the corresponding LEDs and playing the associated musical notes using the
buzzer. For example, if the pattern is [C, E, G, A], you would light up the
LEDs connected to the corresponding buttons and play the notes C, E, G, and A
in order.
Step4: Player Input:
Allow the player to input their response by
pressing the buttons corresponding to the musical notes in the pattern
sequence. Each button press should trigger a sound feedback from the buzzer to
acknowledge the player’s input. For example, when the player presses the button
associated with the note C, the buzzer emits a sound indicating the correct
button press. Compare the player’s input sequence with the pattern
sequence played by the Arduino. Store the player’s input in an array or list.
After the player completes their input, compare the stored input sequence with
the pattern sequence to check for a match.
Step5: Match Check:
Iterate through the player’s input sequence and
the pattern sequence, comparing the notes at each position. If the sequences
match perfectly, it means the player reproduced the pattern correctly. Provide
positive feedback, such as playing a success sound effect and illuminating all
the LEDs simultaneously. If the player’s input sequence does not match the
pattern sequence, provide negative feedback, such as playing an error sound
effect and blinking the LEDs rapidly to indicate an incorrect response.
Step6: Win Condition:
Track the player’s progress and set a win
condition, such as successfully matching a predetermined number of pattern
sequences. If the player achieves the win condition, declare them as the winner
and provide appropriate feedback, such as playing a victory sound effect and
displaying a winning message on a connected display.
Step5: Game Loop:
Implement a loop that allows the game to
continue playing pattern sequences and receiving player input until the game
ends. Each successful pattern match can increase the difficulty by adding a new
note to the pattern or increasing the pattern length.
3. Things that you will get with models:
1. Detailed Model
2. Well soldered circuits
2. Well soldered circuits
3. PPT
4. Full Setup
4. Project price:
You can buy this project at price 1400 Rs.
You can also customize your project according to your requirement as below:
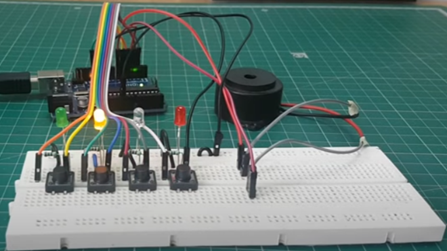
The price of this projects depend on the component used in the model, for example in the above model the component used is:
1. Arduino UNO
2. OLED display
3. Battery for power supply
4. 4 Buttons
5. 4 Resistors
6. 4 LEDs
7. buzzer
8. connecting wire
9. other small components
There are some other optional component available that you can remove or add it to the model according to your need, so the price of the project will decrease or increase according to price of component used in the project and coding for example:
1. With display:
You can add display to this project for visual feedback such as displaying score, with this component the price of project is 1500 Rs.
In summery, you can tell us what functionalities and components that you want to add or remove from the model, so the price will change accordingly. If you have any question related to this project then contact me: click here
Basically you will get all this things that required to present this project in front of your external, teacher, for practical use at your home or to show off in front of your friends 😉😉,so if you want to buy this project then fill this google form: https://docs.google.com/forms/d/e/1FAIpQLSfDQvyFqN1iDLOFhGNB0KK_nEW1rZujUEdmvNNQNazXK4tAZA/viewform?usp=sf_link
Note: The image shown is a conceptual representation and may not accurately reflect the final design or features of the actual model. The actual model will be developed based on extensive research, engineering, and design processes to ensure optimal performance and user experience.
Feel free to contact me I am always here for you
About Us: click here
Contact Detail: click here
For delivery detail: click here
Telegram: https://t.me/arduinoproject1

Comments
Post a Comment