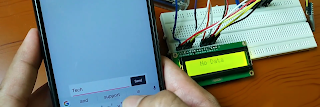
Project No. 26: Creating a Wireless Notice Board With NodeMCU
1. Introduction:
Welcome to the
"Wireless Notice Board with NodeMCU" project, an innovative solution
designed to modernize traditional notice boards and streamline the process of
sharing information in public spaces. By harnessing the power of wireless
technology and the NodeMCU microcontroller, this project aims to revolutionize
communication by providing an efficient and flexible means of displaying
messages and announcements.
In today's fast-paced
world, effective communication is vital, whether it's for conveying important
announcements, displaying schedules, or sharing general information.
Traditional notice boards often require physical interaction and manual
updates, which can be time-consuming and inefficient. The "Wireless Notice
Board with NodeMCU" project addresses these challenges by leveraging
wireless connectivity to enable remote updates and real-time information
dissemination.
2. Working:
Step1: Wireless Connectivity:Configure the NodeMCU to connect to an
established Wi-Fi network, providing it with internet access and enabling
communication with authorized devices.
Step2: Web Interface or Mobile App: Develop a web-based interface or a dedicated
mobile application that allows authorized individuals to input and submit
messages or announcements. This interface should securely communicate with the
NodeMCU.
Step3: Message Submission: Using the web interface or mobile app, authorized
personnel can enter the desired messages or announcements along with any
formatting preferences or display settings. Once submitted, the information is
securely transmitted to the NodeMCU.
Step4: Data Preprocessing: The NodeMCU receives the updated message data and
processes it to ensure compatibility with the LCD display. This may involve
formatting the text, adjusting the size, or converting it into a suitable
format for display. Display Update: The processed message data is sent
from the NodeMCU to the microcontroller connected to the LCD display. The
microcontroller controls the display, updating it with the new message content
in real-time.
Step5: Real Time Update: As new messages or announcements are submitted through
the web interface or mobile app, the NodeMCU continuously checks for updates.
If any changes occur, the NodeMCU retrieves the updated content and sends it to
the microcontroller for display on the LCD screen.
Step1: Wireless Connectivity:
Configure the NodeMCU to connect to an
established Wi-Fi network, providing it with internet access and enabling
communication with authorized devices.
Step2: Web Interface or Mobile App:
Develop a web-based interface or a dedicated
mobile application that allows authorized individuals to input and submit
messages or announcements. This interface should securely communicate with the
NodeMCU.
Step3: Message Submission:
Using the web interface or mobile app, authorized
personnel can enter the desired messages or announcements along with any
formatting preferences or display settings. Once submitted, the information is
securely transmitted to the NodeMCU.
Step4: Data Preprocessing:
The NodeMCU receives the updated message data and
processes it to ensure compatibility with the LCD display. This may involve
formatting the text, adjusting the size, or converting it into a suitable
format for display. Display Update: The processed message data is sent
from the NodeMCU to the microcontroller connected to the LCD display. The
microcontroller controls the display, updating it with the new message content
in real-time.
Step5: Real Time Update:
As new messages or announcements are submitted through
the web interface or mobile app, the NodeMCU continuously checks for updates.
If any changes occur, the NodeMCU retrieves the updated content and sends it to
the microcontroller for display on the LCD screen.
3. What is NodeMCU?
A gear motor is a type of electric motor that incorporates a gearbox, or gear train, to control and enhance its output speed and torque. It combines the functions of a motor and a gear system into a single integrated unit.
The primary purpose of a gear motor is to provide mechanical power and motion control in various applications. By using gears, the motor can increase or decrease the output speed and torque according to the requirements of the specific application. Gears are used to transmit power from the motor to the driven load while modifying the characteristics of the output motion.
4. Things that you will get with models:
1. Detailed Model
2. Well soldered circuits
3. PPT
1. Detailed Model
2. Well soldered circuits
3. PPT
5. Project price:
You can buy this project at price 1660 Rs.
You can also customize your project according to your requirement as below:The price of this projects depend on the component used in the model, for example in the above model the component used is:
1. Arduino UNO
2. Battery for power supply
3. LCD Display with I2C connector4. Wireless NodeMCU5. Resistor6. Connecting wire7. Other small components
There are some other optional component available that you can remove or add it to the model according to your need, so the price of the project will decrease or increase according to price of component according to price of component and coding for example:
You can Build the same project with Wi-Fi module, with this component the price of project is 1700Rs.
In summery, you can tell us what functionalities and components that you want to add or remove from the model, so the price will change accordingly. If you have any question related to this project then contact me: click hereBasically you will get all this things that required to present this project in front of your external, teacher, for practical use at your home or to show off in front of your friends 😉😉,so if you want to buy this project then fill this google form: https://docs.google.com/forms/d/e/1FAIpQLSfDQvyFqN1iDLOFhGNB0KK_nEW1rZujUEdmvNNQNazXK4tAZA/viewform?usp=sf_link
You can buy this project at price 1660 Rs.
You can also customize your project according to your requirement as below:
The price of this projects depend on the component used in the model, for example in the above model the component used is:
3. LCD Display with I2C connector
4. Wireless NodeMCU
5. Resistor
6. Connecting wire
7. Other small components
There are some other optional component available that you can remove or add it to the model according to your need, so the price of the project will decrease or increase according to price of component according to price of component and coding for example:
You can Build the same project with Wi-Fi module, with this component the price of project is 1700Rs.
In summery, you can tell us what functionalities and components that you want to add or remove from the model, so the price will change accordingly. If you have any question related to this project then contact me: click here
Basically you will get all this things that required to present this project in front of your external, teacher, for practical use at your home or to show off in front of your friends 😉😉,so if you want to buy this project then fill this google form: https://docs.google.com/forms/d/e/1FAIpQLSfDQvyFqN1iDLOFhGNB0KK_nEW1rZujUEdmvNNQNazXK4tAZA/viewform?usp=sf_link
Note: The image shown is a conceptual representation and may not accurately reflect the final design or features of the actual model. The actual model will be developed based on extensive research, engineering, and design processes to ensure optimal performance and user experience.
Feel free to contact me I am always here for you
About Us: click hereContact Detail: click hereFor delivery detail: click here Telegram: https://t.me/arduinoproject1
Note: The image shown is a conceptual representation and may not accurately reflect the final design or features of the actual model. The actual model will be developed based on extensive research, engineering, and design processes to ensure optimal performance and user experience.
Feel free to contact me I am always here for you
About Us: click here
Contact Detail: click here
For delivery detail: click here
Telegram: https://t.me/arduinoproject1


Comments
Post a Comment